
Part 1: Fundamentals of Glass Working
1. Understanding Glass
- Types of art glass (cathedral, opalescent, textured)
- Color, opacity, and grain
- How to choose glass for your project
2. Essential Tools and Supplies
- Glass cutter & tools
- Glass grinder
- Safety gear: gloves, goggles, mask
3. Glass Safety
- Handling and breaking glass
- Cleaning and storing glass
- Proper disposal of scraps and lead waste
4. Cutting Techniques
- Scoring straight and curved lines
- Using breaking tools properly
- Practice exercises
5. Grinding Edges
- Purpose of grinding
- Demonstration of grinder use
Part 2: Let’s make something Stained Glass!
1. Design
- Discuss design elements and balance
- Choose a project to make
2. Preparing Your Glass
- Pick out glass pieces for your project
- Learn how to trace your pattern
- Cut and shape your pieces
2. Foiling
- What foil does and how it works
- Wrapping technique
- Burnishing tips
3. Soldering Basics
- Safety considerations when soldering
- Applying flux and solder
- Adding jump rings (if needed)
4. Final Showcase & Feedback
Understanding Glass
Stained glass is as much about light as it is about color and texture. Choosing the right glass is crucial for both aesthetic appeal and technical success in your project. In this section, we’ll explore the different types of art glass, how their properties affect your design, and how to select the best glass for your specific needs.
Types of Art Glass
- Cathedral Glass
- Transparent and often brightly colored
- Light passes through easily, casting vibrant shadows
- Ideal for projects that emphasize illumination and bold color
- Opalescent Glass
- More opaque with a milky appearance
- Often swirled with multiple colors and has a rich, layered depth
- Best used when you want to diffuse light or add visual texture
- Textured Glass
- Comes with surface textures like ripples, hammered finishes, or glue chip effects
- Provides privacy while allowing light through
- Adds dimension and tactile interest to your design
Color, Opacity, and Grain
- Color
- The primary design element in stained glass
- Consider color harmony and contrast when choosing your palette
- Remember: colors can look different in various lighting conditions
- Opacity
- Ranges from transparent to opaque
- Affects how much light comes through and how intense the colors appear
- Mix opacities to create depth and layering
- Grain
- Refers to the direction of striations or patterns in the glass
- Important when cutting pieces—grain can affect strength and the look of your final design
- Always plan cuts with the grain in mind for consistency and visual flow
How to Choose Glass for Your Project
- Define Your Goal
- Are you making a window, sun catcher, lamp, or mosaic?
- Consider whether the piece will be backlit or front-lit, indoors or outdoors
- Use a Light Box or Natural Light
- Evaluate glass samples with a light source behind them to see true colors and textures
- Balance Texture and Detail
- Highly textured glass can obscure fine design details
- Use smoother glass for intricate work, and textured glass for backgrounds or larger areas
- Think About Cutting
- Some types of glass are more difficult to cut, such as heavily textured or thick opalescent sheets
- Choose easier-to-cut glass for beginners or complex shapes
- Mix and Match
- Combining different types of glass can make a design pop
- Use contrasting textures and opacities to create visual interest
By understanding the types and characteristics of stained glass, you’ll be able to make informed choices that enhance the artistry and functionality of your work. Let your design guide your glass selection—and don’t be afraid to experiment!
Essential Tools and Supplies
Whether you’re just beginning your stained glass journey or setting up a more permanent workshop, having the right tools will make your experience safer, easier, and more enjoyable. Here are the core tools and supplies every stained glass artist needs:
1. Glass Cutter
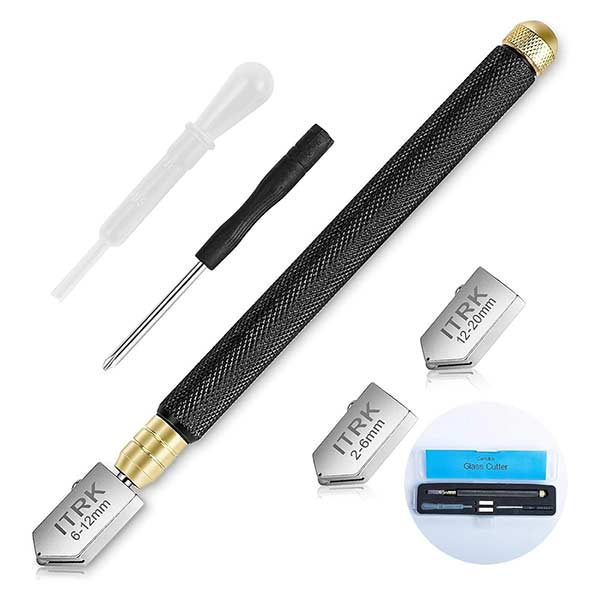
A glass cutter is your most basic and essential tool. It’s used to score the surface of the stained glass so it can be broken cleanly along the line.
- Types: Pistol-grip and pencil-style cutters
- Tip: Use oil-fed cutters for smoother scoring and longer blade life.

2. Running Pliers
Running pliers are used to apply pressure evenly along the scored line to break the glass cleanly.
- Feature: Curved jaws and adjustable pressure screw.
- Tip: Line up the center mark on the pliers with the score line for best results.

3. Grozing Pliers
These pliers help nibble or break off small pieces of glass. They’re great for shaping curved edges or fine-tuning difficult cuts.
- Use: Roughing and shaping edges manually.
- Tip: Use the serrated jaw for breaking and the flat side for grozing (nibbling).

4. Foil and Soldering Supplies
You’ll need copper foil, flux, solder, and a soldering iron for assembling your pieces.
- Copper Foil: Wraps around each piece of glass to create a solderable surface.
- Flux: Helps solder adhere to the foil.
- Solder: 60/40 (tin/lead) is ideal for beginners.
- Soldering Iron: A temperature-controlled iron (80-100 watts) gives the best results.
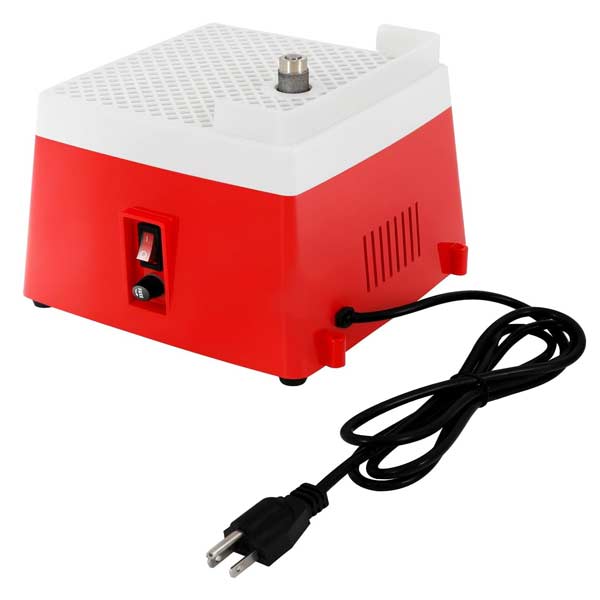
5. Glass Grinder
A glass grinder smooths and shapes glass edges and helps the foil stick better.
- Feature: Flat work surface with spinning diamond bit.
- Tip: Always keep the sponge wet and use safety goggles when grinding.

6. Safety Gear
Stained glass involves sharp edges, solder fumes, and tiny glass particles, so protection is key.
- Gloves: Cut-resistant gloves protect fingers during handling and cutting.
- Goggles or Safety Glasses: Always wear eye protection, especially when breaking glass or grinding.
- Mask or Respirator: A dust mask helps avoid inhaling glass dust or fumes during soldering.
Optional But Helpful:
- Workbench with good lighting
- Glass storage rack
- Foiling jig for straight lines
- Heat-resistant work mat
Final Tip: Start with a beginner kit that includes most of these tools, or borrow before buying premium versions. Proper tools can make or break your stained glass experience—pun intended!
Glass Safety
Objective:
Students will understand best practices for safely handling, cleaning, storing, and disposing of glass and associated materials, including lead.
Lesson Overview:
Working with stained glass is both rewarding and potentially hazardous. This lesson covers essential safety protocols related to handling, cleaning, storing, and disposing of glass and materials like lead came and foil. By mastering these practices, students will minimize risks and create a safer, more organized workspace.
Lesson Outline:
1. Handling and Breaking Glass
- Always wear safety glasses when scoring and breaking glass.
- Use proper hand protection such as nitrile gloves or leather finger protectors to avoid cuts.
- Score lightly, break decisively: Excess pressure or poor technique leads to dangerous breaks.
- When breaking, always direct force away from the body and others.
- Keep glass edges away from work surfaces to avoid scratches and accidental breakage.
2. Cleaning and Storing Glass
- Wipe down new glass with a damp cloth to remove factory residue and dust.
- Store glass vertically in racks or bins with dividers—avoid stacking flat.
- Label glass types or colors if needed.
- Keep scraps in a designated bin for reuse, but remove sharp shards first.
- Avoid moisture or humidity around glass to prevent slippage or mold on wood racks.
3. Proper Disposal of Scraps
- Glass scraps:
- Place small shards in a sturdy container (e.g., a sealed coffee can) before discarding.
- Label clearly: “Broken Glass – Do Not Recycle”
Materials Needed:
- Safety glasses and gloves
- Scoring tool and running pliers
- Glass sheets and scrap bin
- Lead came/foil samples
- Labels and containers for disposal
Cutting Techniques
1. Introduction to Cutting Techniques
- Importance of precision and safety.
- Understanding how glass behaves under stress.
- Overview of score and break principles: “Score once, break once.”
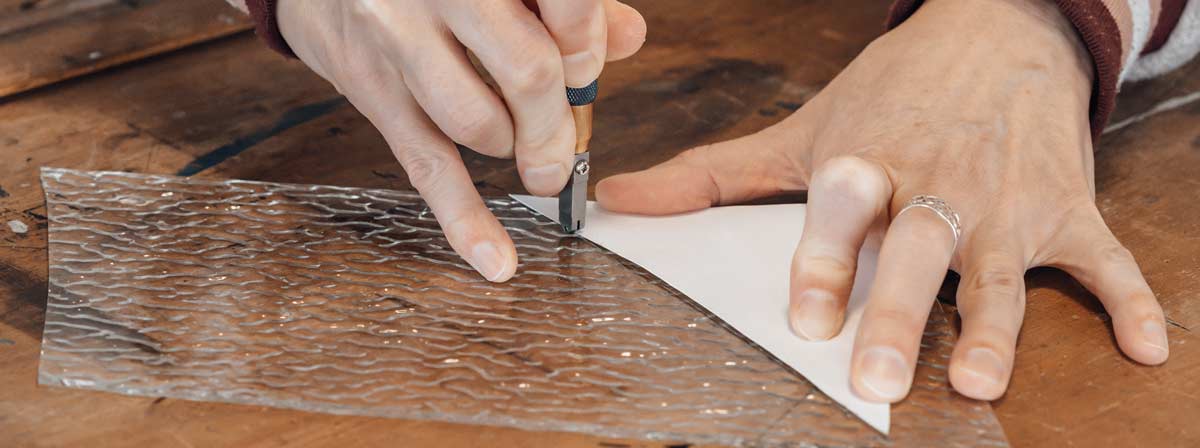
2. Scoring Straight Lines
- Tool Setup:
- Ensure your glass cutter is oiled and the wheel spins freely.
- Place your straight edge or ruler along the desired cut line.
- Technique:
- Apply moderate, even pressure.
- Hold the cutter perpendicular to the glass.
- Score from edge to edge in a single continuous motion — do not go over the score a second time.
- You should hear a clean, zipping sound.
- Common Mistakes:
- Uneven pressure leads to jagged breaks.
- Over-scoring weakens the glass unpredictably.
3. Breaking Straight Lines
- Use running pliers aligned with the scored line.
- Center the score in the notch of the pliers and squeeze gently.
- Glass should snap cleanly along the line.
- Use grozing pliers to clean up or nibble uneven edges.
4. Scoring Curved Lines
- Use a circle cutter for consistent circular shapes, or a French curve for free-form designs.
- Score the curve slowly and steadily.
- The goal is a consistent depth of score along the entire curve.
5. Breaking Curved Lines
- Tap lightly underneath the score to begin separation.
- For tighter curves, use grozing pliers to nibble away small sections along the score.
- Practice patience—rushing often ruins curves.
🧪 Practice Exercises:
- Straight Cuts:
- Score and break 3 vertical and 3 horizontal lines on 6″x6″ glass sheets.
- Grid Pattern:
- Divide a 6″x6″ square into 1″x1″ tiles using only a cutter and straight edge.
- Basic Curves:
- Cut a semicircle and a full circle from a square sheet.
- Try an S-curve using a freehand guide or template.
- Combination Practice:
- Design a simple geometric pattern involving both straight and curved cuts.
✅ Safety Reminders:
- Always wear safety glasses.
- Use gloves if you’re new or handling lots of sharp edges.
- Keep your work area clean of shards.
- Dispose of scrap glass in a puncture-proof container.
Grinding Edges

✦ Purpose of Grinding
Grinding edges is an essential step in preparing metal pieces for welding, assembly, or finishing. The main purposes include:
- Smoothing sharp edges for safety and aesthetics
- Removing burrs left from cutting or sawing
- Creating bevels to prepare joints for welding
- Ensuring flat, clean contact surfaces for better adhesion or fitting
Proper grinding ensures your project looks polished and professional while reducing the risk of injury or improper fitting.
⚙️ Demonstration of Grinder Use
Tools Required:
- Glass grinder
- Appropriate grinding bit(s) – various coarseness
- Safety gear: Safety Glasses
Steps Demonstrated:
- Inspect the grinder: Ensure the workspace is clear, the surface is clean and the bit is not damaged.
- Grip properly: Use both hands on the glass for best accuracy and to hold the glass in place.
- Start the grinder: Let it reach full speed before contacting the glass to the bit.
- Do not force the grinder: Let the tool do the work. Pushing too hard can gouge the surface or cause kickback.
- Check your work: Stop periodically to inspect the edge and prevent over-grinding.
🖐️ Hands-On Practice
Objective:
Students will grind sample glass pieces using an glass grinder to develop confidence and technique.
Steps:
- Choose a sample glass piece with rough edges.
- Put on all required safety equipment.
- Watch the instructor’s demo again if unsure.
- Begin grinding edges on your piece, checking frequently.
- Ask for feedback and guidance from the instructor.
⚠️ Safety Cautions
- ALWAYS wear eye and face protection. Grinding can send small shards flying.
- Never use a cracked or damaged grinding bit.
- Avoid loose clothing and tie back long hair.
- Hold the glass firmly. Kickback can occur if the grinder catches.
✅ GrindingTips
- Use light passes instead of aggressive grinding.
- Try both inside and outside edge grinding.
- Grind both a flat edge and a beveled one to compare.
Foiling Edges
Foiling is one of the most important steps in creating copper foil stained glass. It allows the solder to adhere to your glass pieces and creates clean, strong joins between them.
What Foil Does and How It Works
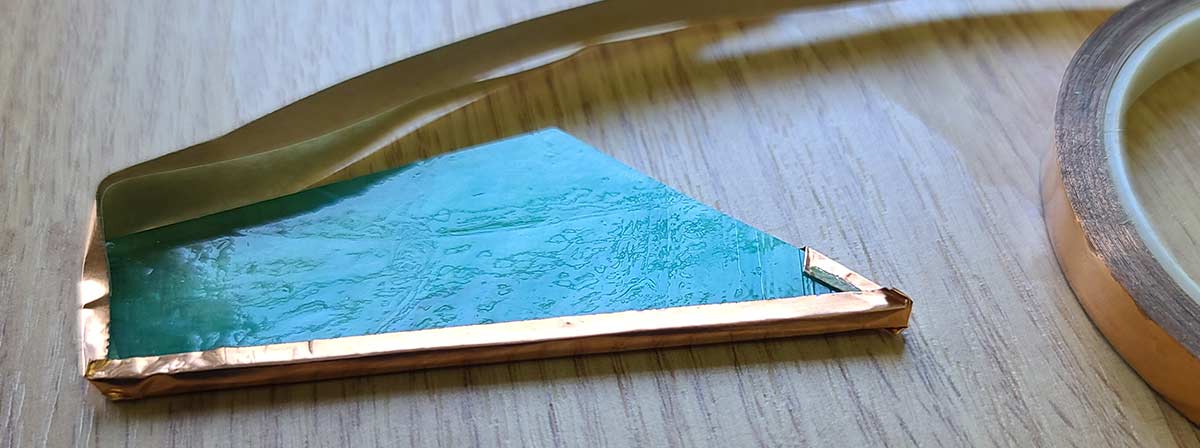
Copper foil is a thin strip of adhesive-backed metal that wraps around the edges of each piece of glass. When burnished and soldered, the foil creates a strong bond between adjacent glass pieces and allows the solder to flow smoothly across the seams.
- The adhesive holds the foil in place during assembly.
- The copper surface provides a base for the solder to stick.
- Foil is flexible, allowing it to contour around irregular shapes.
Choosing the Right Foil Width
Foil comes in various widths and thicknesses. Choosing the right one is critical for achieving clean lines and solid construction.
- 3/16” (standard width): Most commonly used; good for regular stained glass projects.
- 7/32” (slightly wider): Offers a bit more overlap, great for thicker glass or beginners.
- 1/4” or wider: Used for unusually thick glass or when a bold solder line is desired.
💡 Tip: Match your foil width to the thickness of your glass for best results. The foil should wrap around the edge with just a small margin on each face of the glass.
Wrapping Technique
Proper wrapping ensures a strong structure and good solder flow.
- Center the foil along the edge of the glass. Peel back a few inches of the paper backing at a time.
- Press the foil down gently, keeping it even on both sides.
- Miter the corners by pinching and folding for clean, tight edges.
- After wrapping, use your fingers to gently press the foil around the glass.
💡 Avoid stretching the foil—this can lead to lifting later.
Burnishing Tips
Burnishing is the process of pressing and smoothing the foil so it adheres securely.
- Use a fid, popsicle stick, or plastic pen cap to burnish.
- Smooth out all edges and corners firmly.
- Pay special attention to corners, curves, and any overlapping seams.
💡 Well-burnished foil ensures smooth soldering and prevents lifting during the heating process.
Soldering Basics
Soldering is a key step in creating stained glass artwork using the copper foil method. This process bonds pieces of glass together into a cohesive, durable design. Below is a comprehensive guide for beginners and hobbyists learning how to solder stained glass.
🛡️ 1. Safety Considerations When Soldering
- Ventilation: Always work in a well-ventilated area. Soldering produces fumes that can be harmful over time.
- Protective Gear: Wear safety glasses to protect your eyes from splashes or sharp glass. Use nitrile gloves when applying flux and avoid touching your face.
- Work Surface: Use a heat-resistant, non-flammable surface like a soldering mat or ceramic board.
- Soldering Iron Safety: Never leave a hot soldering iron unattended. Use a sturdy stand and unplug it when not in use.
- Avoid Lead Exposure: If using leaded solder, wash hands thoroughly after handling and keep away from food and drink.
🔧 2. Applying Flux and Tinning
- Flux Purpose: Flux helps solder flow smoothly and bond to the copper foil. Use a liquid flux designed for stained glass.
- Application Tips:
- Use a small, dedicated flux brush or Q-tip.
- Apply flux evenly to all copper-foiled seams before soldering.
- Tinning Technique:
- Heat your soldering iron to 700–750°F (370–400°C).
- Apply a small amount of solder to the iron tip and quickly coat each seam with a thin, shiny layer.
- This helps create smoother final seams and prevents oxidation.
🧵 3. Creating Neat Solder Seams
- Materials Needed:
- 60/40 or 63/37 lead solder (for smoother flow and stronger bonds).
- Temperature-controlled soldering iron (80W+).
- Techniques:
- Hold the iron like a pen and apply solder wire to the foil seam, not the iron.
- Move the iron slowly and steadily for even beads.
- Don’t overwork the seam—it may cause unevenness or burn the foil.
- Tips for Smooth Beads:
- Practice makes perfect—use scrap glass to practice.
- If the solder balls or resists flowing, clean the foil or add more flux.
🪝 4. Adding Jump Rings (If Needed)
- Purpose: Jump rings allow your piece to hang.
- How To Add:
- Pre-tin the jump ring by applying a small amount of solder.
- Hold the ring in place (usually at the top corners or center).
- Apply heat to the ring and the surrounding solder seam simultaneously until it bonds.
- Pro Tip: For larger or heavier pieces, add reinforcing wire or double rings.
🧼 5. Cleaning and Finishing the Piece
- Neutralize Flux Residue: Use a flux cleaner or a mix of mild dish soap and warm water with a soft toothbrush to scrub seams.
- Dry Thoroughly: Dry the piece completely to prevent oxidation.
- Polishing:
- Use carnauba wax polish or stained glass finishing compound for shine and protection.
- Buff gently with a clean, soft cloth.
🧰 Recommended Materials and Tools
| Item | Recommended Product |
| Solder | 60/40 Rosin Core or 63/37 (lead-based) |
| Flux | Classic Gel Flux or Nokorode Liquid Flux |
| Soldering Iron | Hakko FX601 or Weller W100PG |
| Iron Tip Cleaner | Brass sponge or wet dish sponge |
| Work Surface | Heat-resistant board or grid |
| Safety Gear | Safety glasses, gloves, mask (optional for fumes) |
| Cleaner | Kwik-Clean Flux Remover or mild dish soap solution |